Wednesday, October 26, 2022

Shift Key not working in Remote Desktop Connection - Windows

Shift Key not working in Remote Desktop Connection Full Screen Mode

Remote desktop connection upper case letters work until the rdp session is changed to full screen mode. In full screen mode the shift key stopped working which would not allow upper case letters, such as for passwords or general punctuation, to be typed in from the keyboard. 


Stickey-keys- Shift key not working in remote desktop session.

Shift key not working in Remote Desktop Connection Full Screen mode

There are multiple posts  and forums that indicate turning off sticky keys will solve the problem of shift not working in RDP session. Since sticky keys was not enabled on the systems I was having this problem with I simply tried ENABLING it instead. I was able to have the shift key working again by turning on sticky keys . Since i really didn't need sticky keys, I then changed the options or behavior of sticky keys and disabled all features of it BUT left it "on". 

Can't type upper case in RDP (Remote Desktop Connection) session. 


See below, that with Sticky keys enabled, all features are unchecked. Play sound was left not because it was needed but instead because I just didn't care about sounds. 


 Or this version of the UI which contains the same settings with a different look. 


Please share so others can find this post faster. 

QoS can be applied for RDP connections to devices such as servers and desktop or for managing RDP connections centrally online. 


Share/Save/Bookmark

Monday, October 24, 2022

Disable Windows Location Service Using Windows 10 Registry

Disable or Enable Windows Location Service Using the Registry


Registry Keys to Turn on or Turn off Windows Location services


There are two registry keys that cna turn lcoation sercie on and off. one of the keys is for the user and the other key is for the computer system (laptop or desktop) It doesn;t matter if the desktop or laptrop is physical or avirtual machine. The registry keys to turn lcoation services on or turm lcoation services off are the same. 

The location services UI will allow you to turn lcoation services on and turn location serivces off bt not for both the computer and User. You can also turn lcoation serices off or turn lcoation serivces off per applciation using the Location Service user interface of windows 10. 

The windows registry location for user setting to turn off or turn on Location services is: 

Computer\HKEY_CURRENT_USER\SOFTWARE\Microsoft\Windows\CurrentVersion\CapabilityAccessManager\ConsentStore\location


The windows registry location for computer settings to turn off or turn on Location services is: 

Computer\HKEY_LOCAL_MACHINE\SOFTWARE\Microsoft\Windows\CurrentVersion\CapabilityAccessManager\ConsentStore\location


Set both or either to Deny or Allow. 
Set to Deny to turn off and set to Allow to turn on Location services. 


To create a reg merge file , open notepad and copy the following into the new note and save as Turn-off-location-services.reg (or a name of your choosing) . make sure you use the .reg extension. 

Windows Registry Editor Version 5.00

[HKEY_LOCAL_MACHINE\SOFTWARE\Microsoft\Windows\CurrentVersion\CapabilityAccessManager\ConsentStore\location]
"Value"="Deny"


Please share so others could find this information faster. Thank you. 


Share/Save/Bookmark

Friday, October 14, 2022

User Profile Cannot Be Loaded


User Profile Cannot Be Loaded, Windows Login , Roaming Profile, Redirected Folders. 


Have you seen this  when logging in or working on an issue your users are having. 
If there is redirected folders and roaming profile for appdatta, the causes could be many. The solution i found just recently was the user's profile was actually maybe corrupted. if not corrupted, there was a problem that was causing this within the profile. 
This environment was using citrix but this problem is not limited to Citrix. This could occur with terminal server (remote desktop service host) or even just a plain desktop connected to the domain. 
In this case there was a group policy that redirect users folders to a server share as well as the appdata roaming folders.  The enthronement consisted of pooled desktops which mean users would get random non persistent desktop. Again as stated, this problem could occur on a physical desktop, there is not need to have virtual desktop for this issue to occur but it does appear more often when working with virtualization. 

Rename the users roaming profile folder . Add _OLD at the end or something similar. DO NOT recreate the user's folder manually. Have the user login and the folders will re-create automatically with the correct permissions applied to hem. If you create it manually as an administrator, you'll have to manually set all the permissions for SYSTEM creator owner , the user, etc.. it's easier to have the login process create them for you. All this can be done from a vmware console, or RMM MSP type management software that allows remote access and control. not limited to either vmware of RMM, other software for desktop remote access can be used and it's your choice which one . 


Share/Save/Bookmark

Thursday, June 16, 2022

Start a Manual Sync of Local AD to Azure


Start a manual sync of Active Directory changes easily using PowerShell on your Azure AD sync server. Password resets are fast, they occur immediately but other AD object and properties don't replicate to azure so quickly. Microsoft has restricted Azure AD connect services to 30 minute interval for syncing updates, additions , or changes to local Microsoft AD to Azure. So this means that even new user accounts added to your local Active Directory will take up to 30 minutes or more to sync up to Azure. 

If you have multiple sites with active directory controllers located at each site you may also have a delay due to internal local Active directory replication. Make sure your AD is free of errors and sync your local AD first. Syncing AD and syncing local AD to Azure can be done remotely or through a local console of the server. For remote access, online desktop support software can provide the remote control access you need. With applications for support, you could even work on networking devices remotely such as firewall's network switches and routers. Software for online computer support is used for both server and desktop support. Active Directory issue can be resolved with remote support software and also desktop applications. 

I've used the following command to sync all domain controllers. The options to the command line cause all domain controllers enterprise-wide to sync. So that means the domain controller server that are local to the Azure Sync server and other domain controllers that are located i other office or datacenters replicate  and sync.  

open an elevated command prompt on a domain controller and enter the following command to sync all domain controllers. 

                              repadmin /syncall /APeD 

Case is important with this command as upper case and loser case letters could have different options and thus do different things. None of which would be destructive but you may also not get the desired affect if the case of the letters is wrong.  Access  your domain controller using RDP or VMware console of if it's physical server get on the console of it. 

Syncing domain controllers should only take a few seconds to a minute. Once that's done, open a PowerShell command on the Azure sync server (that's the server running the Azure AD connect services).
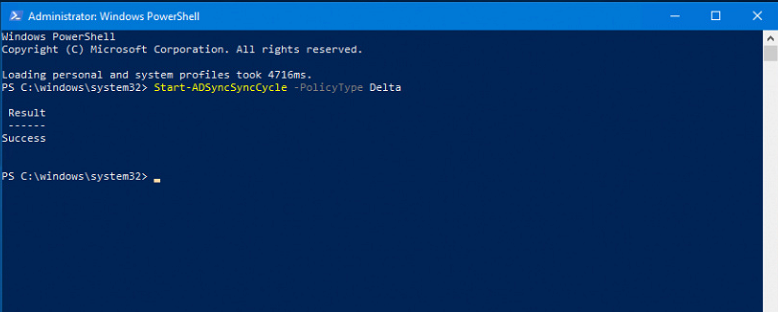
Run the command from the PowerShell prompt to sync local changes and updates to Azure. 

                            Start-SyncSyncCycle -PolicyType Delta 

This will trigger and immediate syncing of changes updates and additions to Azure. After the sync is complete, you may have to wait several seconds to a minute at times to the changes in Azure. 


Share/Save/Bookmark


Thursday, May 05, 2022

Two Little Blue Arrows on Folder and File Icons


What do the Little Blue Arrows on Folders and File Icons mean.


What do the Little Blue Arrows on Folders and File Icons mean


Windows will display little blue arrows on folders when the folder and it's file contents are compressed.  This issue with Folders and files on the desktop can be resolved using Online Desktop Support Software. Software that gives technical support the ability to connect remotely to a desktop and control it to fix the problem fast. Access desktops, Servers, Network switches and even firewalls online remotely.  

This can be verified by using a command line executable tool name compact 
Open a command prompt ,  go to the directory or drive letter and run the command  "compact". 
Here's an example using the C drive but it can be any drive such as in the example screen shot it is an E drive of a server  . type compact and hit enter.  
                       C:\>compact  
 
To go through subfolders / directories use the command line option of /s  C:\>compact /s
 
                      
Little Blue Arrows on Folders and File Icons mean


The C next to the folder indicates the folder named active is compressed.  This is from a server I was working on. 

Windows 10 , 11 and expect future releases of Windows automatically begin to compress folders and files when disk space gets low. So even if you've not enabled compression on any particular folder or drive letter, it will turn on automatically. Related post about compression and blue arrows on folders and files Windows File Explore with relevant information. The solution was simple, compression that activates automatically when the C drive of a Windows system desktop runs low on free space.  Hope this helps. 


Share/Save/Bookmark


Access desktops, Servers, Network switches and even firewalls online remotely.  


Sunday, April 12, 2015

ActiveSync Mail Stuck at Loading - Android, iPhone, Tablet, All SmartPhones


Please Share so other can find this solution faster
Share/Save/Bookmark

ActiveSync Mail Stuck at Loading

The fix for this is simple.
A client encountered and interesting problem. She had called in and stated that when accessing email through her smartphone using Microsoft ActiveSync, the account would successfully setup but never displayed messages.  No errors during account setup but no folders or emails would ever be listed. The smartphone in this case was an Android but might as well have been an iPhone, Tablet, Blackberry or anything else. The issue had nothing to do with the device. The issue was related to permissions.

Permissions Preventing Email from Displaying on Android, iPhone, any ActiveSync Device


I used a smartphone simulator to test Microsoft Active-sync with a test account. The results were very similar. The account would setup fine but no email. It appeared to be stuck. The smartphone would setup the email account fine, tried auto-discover and manual setup, but email would never display and although there was no error sending email, email was never sent. There was no Global address list Contacts displayed either.
I hope this saves someone some time by finding and viewing this post. I have also posted this as a reminder for me too in case I encounter this issue again. It is rare but can appear.

Active-Sync Mail Account Setup Completes but no Email or Email Folders

The solution is simple, set inheritable permissions check-box for the user.

Using Active Directory Users and Computers > Find the user > select the Security tab > Click the Advanced button > check the box Include Inheritable permissions 


Please see the image below.


Save and then either recreate the account on the ActiveSync device (iPhone, Android, Tablet, iPad, Blackberry, etc) or restart the device to force a re-connection, or close email completely and restart it.


.

Saturday, March 21, 2015

Outlook Keeps Prompting Connecting to Office365 Email


Outlook Keeps Asking for Password Credentials, Office 365. 

Outlook 2010 not fully completing the setup process when connecting to Office 365 can occur more often with Outlook installed on Windows XP. One of the signs to this problem is that under the security tab when using the manual configuration method does not display Anonymous Authentication as an option. Anonymous authentication works well but is the default for Outlook 2013, not Outlook 2010 and Outlook 2007. Outlook 2010 and Outlook 2007 do not have this option by default. In this specific case for which I generated this article, the desktop Windows XP and started out with Outlook 2007 which as one of the attempts at resolving this issue was upgraded to Outlook 2010 with SP1. The first two check-marks appeared during automatic Outlook setup but the third would repeatedly prompt for a password. The setup would not fully complete. The password was correct and was tested using Outlook Web Access.


Please Share others can find this solution faster
Share/Save/Bookmark 

Outlook Office 365 Configuration Does not Complete

Outlook Keeps Prompting for Password  

Outlook 2010 with SP1 installed on Windows XP with SP3 and other updates would not connect to Office 365 for email. It would not fully setup. Outlook constantly prompted the user for a password. The password was well known and being entered correctly. As previously mentioned this desktop originally had Outlook 2007 which was upgraded to Outlook 2010 and this upgrade process may not have been required at all. One of the best ways to assist users with this problem and to provide support for this and other issues is by using software that enables access over the web. In particular, to connect to a remote computer system and fix the technical  problems remotely with online software for remote desktop control. The software enables remote connectivity and access. This Outlook email and other technical general desktop issues in general can be resolved with screen-sharing. 

Resolving Outlook Setup Not Completing with Office 365

A little more back ground first to help set the stage as to why the focus was completely placed on the local desktop and environment. The user's account setup with no problem in Outlook on an off-site computer desktop. The off-site computer was not connected to the domain and there was no VPN connecting it to the domain.

The steps taken to resolve this issue consisted of : 

Registry Changes: 

Run Regedit and go to  HKEY_CURRENT_USER\Software\Microsoft\Office\14.0\Outlook\AutoDiscover
for Outlook 2010

Add or modify the following

"ExcludeScpLookup"=dword:00000001
"ExcludeHttpsAutodiscoverDomain"=dword:00000001
"ExcludeHttpsRootDomain"=dword:00000001
"ExcludeSrvLookup"=dword:00000001
"ExcludeHttpRedirect"=dword:00000000
"ExcludeSrvRecord"=dword:00000001

These keys could also be added to help prevent Outlook frm using the local CAS server if one exists on your network. In this case there was indeed a local Exchange 2007 server. The customer had migrated to Office 365 but the local Exchange server was still present on the network and int he domain.

[HKEY_CURRENT_USER\Software\Microsoft\Office\14.0\Outlook\AutoDiscover\RedirectServers]
"autodiscover-s.outlook.com"=hex(0):
"autodiscover.outlook.com"=hex(0):


The only look-up type that will be used now is HTTP Redirect to the XML file. If this fails, there'll be no Autodiscover. This removes local domain interference.

Microsoft Hotfix to Connect Outlook to Office 365 

The most generally accepted suggestion from many forums, but seems not to always work for people having this problem with Outlook connecting to Office 365,  is to run Windows updates and update your operating system and Microsoft Office installation (at least Outlook 2010). As mentioned previously this particular desktop had Outlook 2007 with Office 2007, I upgraded only Outlook.  Perhaps I did not need to upgrade Outlook at all. The operating system already had Service Pack 3 for Windows XP. I did not run Windows updates because I did not want to have other applications break.

Add the anonymous option to Outlook Logon Security Option list. 


Instead of running every single Windows update available which did not work for many people having the similar issue with Outlook and Office 365, I ran the following a hot-fix. The hot-fix both added the Anonymous option to Outlook's configuration options and enabled Outlook to connect and fully configure to Office 365.

KB Article Number(s): 2791026 Language: All (Global) Platform: i386 Location: (hotfixv4.microsoft.com/.../462115_intl_i386_zip.exe)
KB Article Number(s): 2791026 Language: All (Global) Platform: x64 Location: (hotfixv4.microsoft.com/.../462116_intl_x64_zip.exe)


Share/Save/Bookmark


Saturday, February 01, 2014

Remove System Reserved 100MB Partition or Volume


Windows Server 2008 cycle boots or stuck in Startup Repair Loop

Windows 7 cycle boots or stuck in Startup Repair Loop


The 100 MB system reserved partition that normally contains the boot-manager for windows 2008, Vista, and Windows 7/8, Windows 2008 and 2012 server operating system platforms sometimes need to be removed. Regardless of the reason, there are situations that will call on its removal which are beyond the scope of this post.

Windows Server 2008 Doesn't Boot

Windows 7 Doesn't Boot


This volume/partitions reason for existence is to be the home of the boot files and boot loader. However, if you are finding that this partition is causing boot-up problems, there are ways to successfully.

This will be done with windows 2008 server in mind as juts recenlty there was a need to try to recover from boot-failing server.  On every reboot, the system repair always runs. There are other posts about his problem early (per season) .
Firstly, have the server install media and add it to the dvd drive of the computer. The computer that is attempted to be repaired must have the CD ready.
Insert into drive and satr tthe installation. Select Repair installation. At this point you will have booted from the DVD and selected Repair. Open a command window.
From the command window. run DISKPART. The prompt will change to :
    diskpart >
         type list volume and hit enter. This will list all the volumes.

You will get a list of all volumes with and without drive letters.
                  Similar to the following :


Please Share so others could find this solution faster
Share/Save/Bookmark

Windows Server 2008 stuck in Startup Repair Loop


As seen. the system reserve partition has been assigned the C drive so of coruse this server does not boot and every time the drive letter is set appropriately using diskpart, the drive letter reverts back to C.

So the solution is to copy all the files and folders that are on the reserved partition to the actual Windows drive. In this case that's the E drive. Copy using > xcopy /h as all files are hidden. To view the hidden files when listing the directory contents, use >dir /a:h   .

The boot folder and other files located at the root of the system reserved partition need to be copied to the real C drive. Once they are copied, mark the real C drive as active. remove the letter assignment from the system partition thus freeing up C . Assign C to the real windows drive that now also includes the boot manager files. Use diskpart remove the system reserved partition. Make the Reserve Partition the selected partion to work with. Be sure you have chosen the right partition. active

       diskpart> select volume # {volume # of 100MB reserved partition)
       diskpart> list volume         (be sure you see the asterisc next to the reserved partition)
       diskpart> remove

Make sure the right partition has been marked active:
     select the c volume as the active volume to work with
       diskpart>  select volume # {volume # of the the C volume)
       diskpart> active

Exit Diskpart by typing exit.

Then run fro mthe command prompt:
bootrec.exe /fixmbr
bootrec.exe /fixboot
bootrec.exe /rebuildbcd
       
Now restart the system .


Thank you Ed Hammond http://edhammond.blogspot.com/2010/07/removing-100mb-system-reserved.html
Another good source http://www.tweakhound.com/2012/11/13/how-to-fix-the-windows-bootloader/

Share/Save/Bookmark

Saturday, August 25, 2012

Basic Cisco QoS for IP Phone System to IP Phone VoIP System Voice Garbled

Share/Save/Bookmark

Sample Cisco QoS for IP Phone System to IP Phone System to Solve Distorted Voice Quality

In this situation, the remote office's router is a Cisco 1841. The VoIP (voice) over a  legacy T1 Point-to-Point was garbled. The conversations sounded like the callers were underwater. There was need to clear up the voice quality and the best method to do so was to use QoS.  The unclear voice occurred on nearly all phone conversations both internal and external. The phone sets at the remote office were digital but the phone system is IP (VoIP) based. The remote office phone system and the phone system at the main office communicated via IP.  The simple solution, using the existing hardware already installed, for this problem was to implement QoS on the router. The goal was to prioritize the voice packets that were sent in and out of the router from one system to another. At the same time, the goal was to also keep the solution as simple as possible.

Cisco Remote Office Router - QoS class-map, policy-map, and access-list on router for Voice Quality

This simple basic QoS example firstly required a simple access list that contained both of the phone systems' ip addresses. After the simple access-list, a class-map and policy-map were also configured on the router. In the end, the policy map is applied to an interface.
 First, in configuration mode of the router,  the access-list. is created.  The access list basically will contain a lists of our phone system ip addresses for the main office and the remote.

Replace the ip addresses shown below with the ip addresses of your phone system. Also, if the access-list number is already taken on your router for another access-list, use another number. This example uses 101 for an extended access list.

   access-list 101 permit ip any host 192.168.1.10
   access-list 101 permit ip any host 192.168.2.10

 Next, create a class-map on the branch router. The class-map is basically a map or list of the match criteria. If you haven't guessed it already, the match criteria will be the ip addresses of the phone systems. In the class-map, we add "match access-group 101. 101 is the access list that contains our phone systems' ip addresses.
    class-map match-any IPPhoneSys-to-IPPhoneSys
   match access-group 101

 After the access-list and class-map is configured, the class-map is applied to the policy map. The policy map can contain more than one class-map.  So the policy-map is like a list of class-maps. The policy-map is applied to an interface. In this example it will be the serial interface corresponding to the T1 (point-to-point T1).: The bandwidth statement is key to what we are trying to accomplish. This is a simple example of QoS so I have just merely taken 20 percent of the bandwidth and pretty much assigned it to voice (VoIP)

    policy-map QoS_Policy_Priority
    class IPPhoneSys-to-IPPhoneSys
    bandwidth percent 20
    class class-default fair-queue

In this example it is a legacy point-to-point T1 that connects the two offices. The interface you use may differ. To apply the policy-map that contains the class-map with 20 percent bandwidth defined for voice change to the interface level commands by entering the interface on which you plan to apply the QoS policy map. In this example it is a serial interface for the t1 (S0/0/0)

    config# interface serial0/0/0

 Then apply the policy on the interface by running the command

    service-policy output QoS_Policy_Priority

 The above is a simple basic QoS policy using one of the many Cisco Modular QoS solutions. Once applied, it cleared the voice issues immediately. In the example above the bandwidth reserved for voice over ip (VoIP) was 20 percent. You can change that percentage to fit your environment.

QoS can be applied to all types of data streams including RDP (remote desktop protocol).  Applicable for access to server and desktop or for managing RDP.  The protocol by port number or IP address can be managed so that it's given higher priority, or lower priority if that's what the situation requires. RDP port setting can be set to a custom value on RDS servers for standard access or for managing RDP (Terminal Server). 
 

Sunday, January 15, 2012

small-portable-fast-malware-anti-virus-scanner


For a fast small portable malware removal scanner try superantispyware portable edition scanner. It is free and can run from the infected computer's hard-drive or from a USB drive. Often malware and other bad-ware will disable internet access or sites that contain tools that can clean the computer.

Superantispyware portable does not need to be installed and can run from a USB or other drive.
I have used this program often over the years and even before they had the portable edition. Works very well.


Share/Save/Bookmark